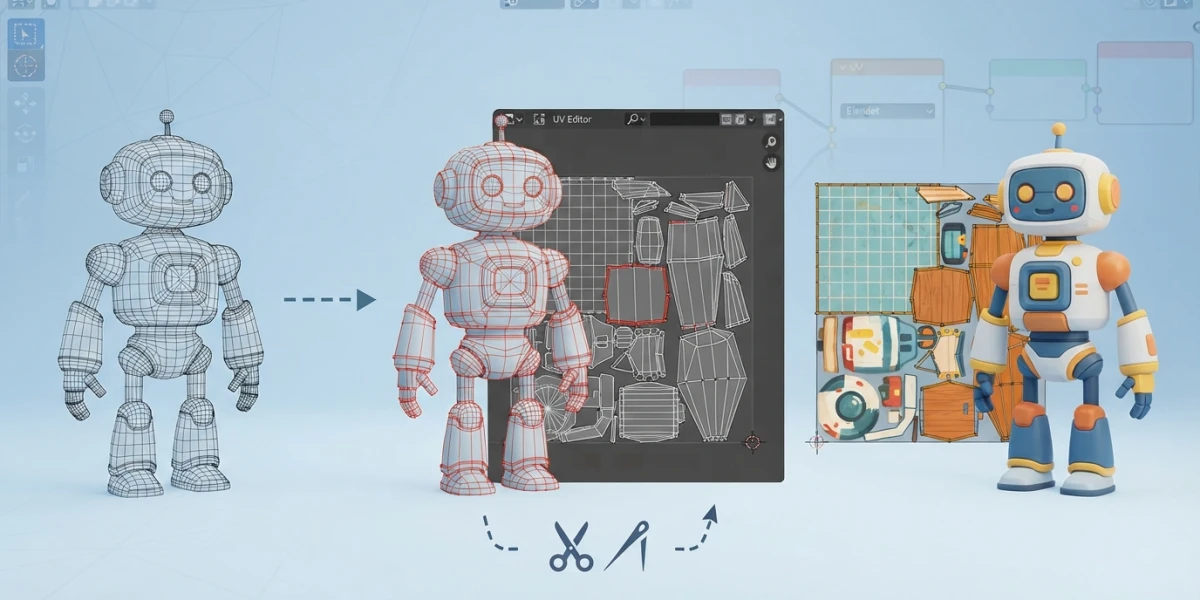
Image generated with AI
UV Mapping in Blender: From Mesh to Texture Map

Diego Cortés
Author
UV mapping in Blender is the bridge between the mesh and the texture: without a clean unwrap, even the most expensive texture looks blurry or stretched. The whole workflow fits into three steps — cut, flatten, and pack — and mastering them separates hobbyist assets from production-ready ones.
What UV mapping is and why it matters
When you model an object, you work with three-dimensional coordinates: X, Y, and Z. Textures, on the other hand, are flat images with only two axes, which Blender calls U and V. UV mapping translates the 3D surface of the mesh into that 2D space, so every point of the texture knows where it has to paint. If that translation is done poorly, you notice it immediately: stretched checker squares or an image that repeats with visible seams.
UV coordinates: a second 2D "skin" wrapped around the 3D mesh
Think of UV coordinates as a second skin: a flat version of your object that wraps around the mesh when you apply it. Every vertex has its own point in the UV map, and that relationship defines how the texture settles on the surface. That is why two objects using the same texture can look very different: it is not about the material, but about the unwrap.
The difference between a crisp texture and a stretched one lives in the unwrap
A crisp texture is the result of a balanced unwrap: each face occupies a portion of the UV map proportional to its real size. When an island is flattened with distortion, the texture pixels are distributed unevenly and stretching appears. A checker-style grid texture reveals it in seconds.
The three steps of unwrapping: cut, flatten, pack
Every UV unwrap follows the same three-stage logic: cut the mesh into pieces that can lie flat, flatten those pieces, and pack the result inside the UV space.
Cut: marking seams with Ctrl+E and the orange-peel metaphor
The first step is deciding where the mesh opens. In Edit Mode you select the edges that will act as cuts and press Ctrl+E to open the Edge menu, where you choose Mark Seam. The official Blender manual describes it like peeling an orange: you cannot flatten the whole peel in one go; first you make cuts, then you spread it out, with some stretching that is simply unavoidable. Seams are those cuts and they mark the places where the UV map will be discontinuous. When choosing them, think about the areas nobody will look at: the back, the inside of a cavity, or the line where two pieces meet.
Flatten: the Unwrap method and the UV Editor view
With the seams marked, select the whole mesh with A and press U to open the unwrap menu, where you choose Unwrap. Blender calculates how to flatten each piece delimited by the seams and places it in the UV Editor: islands appear as silhouettes over a grid background. If the result shows heavily distorted islands, the problem is almost always the seams: either cuts are missing in curved areas or there are too many on surfaces that could lie flat without opening.
Pack: islands, packing and margins between islands
The last step is cleanup. In the UV Editor you reposition the islands to make good use of the space without overlapping, scale them to balance density, and leave a small margin between island and island — the padding — so texture filtering does not bleed pixels from a neighbor. Blender includes packing tools that arrange the islands inside the unit square or the active UDIM tile; most production workflows use them as a starting point.
Automatic unwrap methods
Besides the classic Unwrap, Blender offers automatic methods that solve the unwrap without marking seams by hand. They are great for iterating fast, but you should know what you give up with each one.
Smart UV Project: cuts by angle, ideal for quick hard surface
Smart UV Project analyzes the geometry and cuts along the edges whose angle exceeds a threshold you control, generating islands per surface area. For hard surface — boxes, panels, mechanical parts — it usually produces a decent unwrap in seconds, without touching a single seam.
Project from View and Lightmap Pack: when to use them
Project from View flattens the mesh as seen from the active camera, useful for projecting a reference image, although it distorts anything that does not face it directly. Lightmap Pack optimizes space for baked lighting: it generates small, uniform islands arranged like tiles.
Why Smart UV Project falls short for painting or fine packing
Smart UV Project's speed has a price. By cutting along angles, the resulting islands tend to be fragmented and arbitrarily oriented, which makes painting over the texture awkward and leaves gaps that a manual pack would use better. For assets you are going to paint or with calibrated density, the manual seam workflow is still the way.
Texel density: sharpness is measured, not guessed
Texel density is the amount of texture pixels per world unit — for example, pixels per meter — and it determines how much resolution each part of the object receives. Two objects sharing the same 2K texture can look very different if one distributes that resolution efficiently and the other wastes it.
The checker texture as an instant visual ruler
The fastest way to evaluate density is to assign a checker-style grid texture to the mesh and look at the result in the 3D viewport. If the squares look uniform across the whole object, the unwrap is healthy; if they appear elongated or with uneven sizes, you have distortion or unbalanced density. It is the first test before signing off an unwrap.
The Texel Density Checker add-on, free on Blender Extensions
To measure instead of eyeballing, the Texel Density Checker add-on is available for free on Blender Extensions. It visualizes density with a checker material and per-vertex color, and can recalculate the UVs for a target resolution. It is the tool that guarantees uniform sharpness without estimates.
Unifying density across islands and assets in the same scene
Density is not calibrated per object but per scene: a character, a weapon, and a set piece must share a coherent density so the final image does not betray differences in sharpness. The common practice is to define a reference density — so many pixels per meter — and adjust the islands of each asset to meet it.
UDIM: when a single map is not enough
What UDIM tiles are and what they are used for
A single UV map has a practical resolution ceiling: past a certain pixel count, textures grow in memory without the eye noticing the difference. UDIM divides the UV space into numbered tiles, each with its own high-resolution texture. A production character can use eight, twelve, or more tiles. Large assets — props, sets, creatures — depend on UDIM to reach the detail that film and AAA games demand, and Blender supports them natively.
Common mistakes and how to avoid them
Most UV problems have repeating causes. Knowing them in advance saves you hours of debugging.
Not applying the scale (Ctrl+A) before unwrapping
If you scaled an object in Object Mode but did not apply the transformation, Blender still stores the original scale and will unwrap the mesh as if it had the previous dimensions. The classic result: a cube stretched like a brick that unwraps like a perfect cube, with the texture elongated. The fix is a habit: before unwrapping, select the object and press Ctrl+A, then Apply Scale.
Overlapping islands and visible seams: where to hide them
Overlapping islands make two areas of the object share the same texture pixels: what you paint on one shows up on the other. And poorly chosen seams leave visible lines. The practical rule is to hide them where nobody looks: the underside, the inside of the piece, the joining line with other geometry. If a seam falls in an area of visual tension, it is better to move it even if the unwrap becomes slightly less efficient.
Distortion: how to detect it and redistribute islands
Distortion appears when an island is flattened by stretching its surface: the texture looks elongated or curved in that area. The checker texture exposes it instantly, and the UV Editor lets you fix it by redistributing the island's vertices or adding seams. In extreme cases, it is worth redoing the unwrap of that piece: the time invested pays off during texturing.
Conclusion
UV mapping in Blender is not a chore you do before texturing — it is half the job: it defines the sharpness of everything that comes after. With the cut, flatten, and pack workflow, plus texel density as a measurable criterion, your textures stop depending on luck. The platform's texturing and shading video tutorials take you the rest of the way.