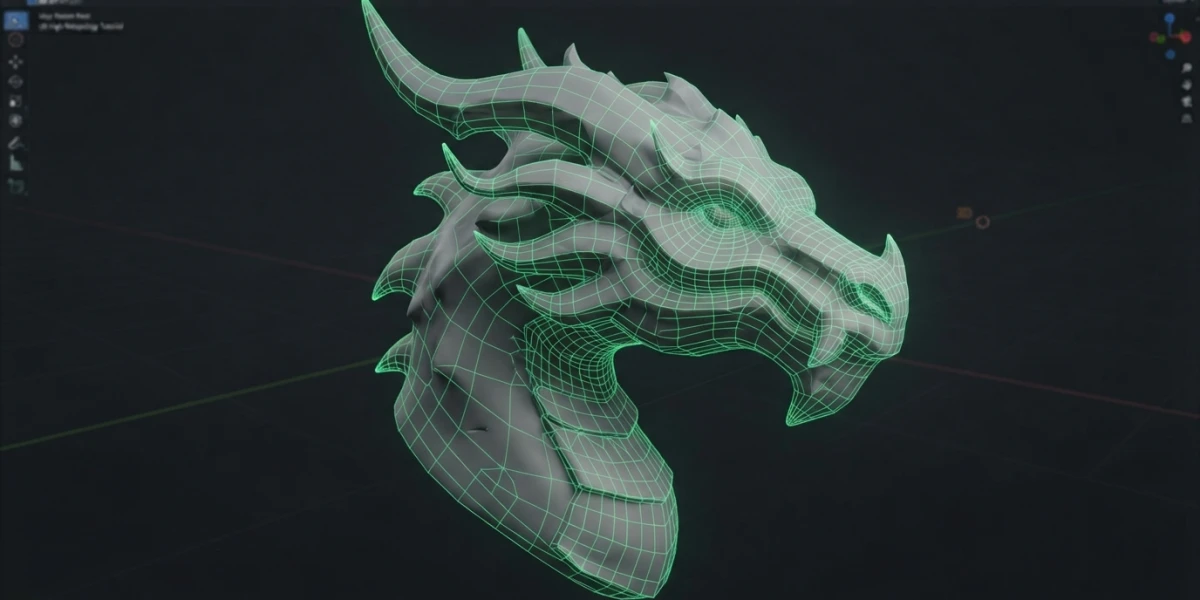
Image generated with AI
Blender Retopology: From Sculpt Mesh to Clean Animation Topology

Diego Cortés
Author
Blender retopology is the bridge between a sculpture of millions of triangles and a model that deforms cleanly when animated. Without this step, your sculpted character breaks or collapses when rigged. Here is when an automatic remesh is enough and when you need to retopologize by hand.
What Retopology Is and Why You Need It
When you sculpt, the mesh fills with millions of irregular polygons, perfect for shaping but useless for animation. Retopology creates a new, clean mesh with controlled density that wraps around the surface of the original sculpture.
The difference between remesh and retopology
Automatic remeshing rebuilds the mesh with uniform topology, but the Blender manual is explicit: it is usually not suitable for deformation. A character's topology must follow the flow of the geometry, with edge loops around the mouth, eyes or elbows, and that is done by hand. Retopologizing means creating a new mesh that overlaps the original one and adjusting it until it covers it and matches its shape.
Which cases need it
You need retopology for animated characters, for meshes that will receive a Subdivision Surface modifier, to fit a real-time polygon budget, or to create a simplified stand-in that physics can use without the calculation cost. It is the natural step after sculpting; in fact, it complements the beginner character sculpting post we published a few days ago.
Automatic Remeshing: Voxel and Quadriflow
Blender includes two automatic remeshers that rebuild the mesh for you. Both are useful, but you need to know exactly what each one is for.
Voxel remesh
Voxel remesh places the mesh in a virtual 3D grid and generates the new mesh with vertices at the grid points closest to the outer surface. The result is uniform topology with no self-intersecting geometry. It is ideal for cleaning and preparing a mesh for sculpting (you fix the resolution beforehand and avoid depending on Dyntopo), for 3D printing, or for physics stand-ins. It is not suitable for deformation topology, for subdivision meshes (Quad wins there) or for reducing polygons (that is Decimate's job).
Voxel settings
The Voxel panel offers several key settings. Voxel Size defines the resolution of the grid. Adaptivity reduces the number of faces and can introduce triangulation; it also disables Fix Poles. Fix Poles, as its name suggests, reduces poles (vertices with more than four edges) to improve flow. Preserve Volume keeps the volume of the mesh, and Attributes preserves attributes such as vertex groups.
Quad remesh (Quadriflow)
Quad remesh uses the Quadriflow algorithm to produce higher quality results, although more slowly. It does not clean intersecting geometry, so the mesh should be reasonably clean before using it. It is the recommended option for generating meshes intended for Subdivision Surface or Multiresolution. In the Quadriflow Remesh pop-up you will find Use Mesh Symmetry, Preserve Sharp, Preserve Mesh Boundary, Smooth Normals and the Ratio, Edge Length or Faces mode. The Seed parameter is especially interesting: each different seed generates a different quad layout, so if the result does not convince you, change the seed before redoing anything.
Limitations of both
Both remeshers only work on the original mesh data: they ignore modifiers and shape keys. In addition, they cannot be used on an object with a Multiresolution modifier. If your sculpture depends on Multires, you will have to apply the modifier or work on a copy.
Manual Retopology: The Classic Workflow
When you need topology that follows the anatomy of the model, remeshing is not enough and you have to do the work by hand. Blender has a well-defined workflow for this.
Preparing the scene
Create a new mesh that covers the original one and adjust it until it wraps around it. Enable the Retopology overlay in the viewport: it lets you see the original mesh through the new one and vice versa, without the distraction of X-Ray, which mixes both geometries. This keeps the visual reference while you build.
Poly Build
Poly Build is the central tool of manual retopology. With it you add, change and remove faces quickly, extending the mesh over the surface of the sculpture. It is the most direct way to build quads that follow the flow of the form.
Snapping
Snapping aligns new vertices to the surface of the original mesh. Once enabled, every vertex you place sticks to the outline of the sculpture, keeping the retopology from floating or sinking. Combined with Poly Build, it is the classic pairing for fast, precise work.
Shrinkwrap as a safety net
The Shrinkwrap modifier projects the retopology mesh onto the surface of another object, the target, which in this case is the sculpture. Even when you work carefully, there is always a vertex out of place; Shrinkwrap sticks them to the surface with a single adjustment and works as a safety net at the end of the process.
Topology Rules for Animation
A retopologized mesh is not just a pretty mesh: it has to deform well. Two rules govern almost everything.
Quads whenever possible, controlled poles
Use quads whenever you can and keep poles under control. Poles, vertices with more than four edges, are unavoidable in some areas, but they should be placed where there is no deformation. Avoid n-gons in areas that move: without a quad structure, rigging and shape keys behave unpredictably.
Edge loops around the areas that deform
Edge loops are rings of edges that surround an area; they should be present around the mouth, eyes, elbows and knees. When the bone rotates, the ring deforms in a controlled way and the surface folds like real skin would. This is the difference between a model that animates cleanly and one that explodes at the first movement.
Tools That Speed Up the Work
Manual retopology requires patience, but there are add-ons that make it much faster.
Retopology add-ons: RetopoFlow and SpeedRetopo
RetopoFlow is the reference add-on, with patching, tweaking, cutting and looping tools, plus the ability to trace topology with strokes; it costs around $85.99. SpeedRetopo, more affordable, lets you draw over the surface and instantly converts the stroke into simplified geometry. Both speed up the most repetitive parts of the workflow without replacing the topology judgment you just learned.
A video resource to see it in action
CG Boost's beginner retopology tutorial on YouTube walks through the complete workflow using only tools and add-ons that already ship with Blender, so you can follow it without buying anything. Seeing the process in motion helps you understand the real pace of the work.
Conclusion
Blender retopology separates those who sculpt from those who animate: with Voxel and Quadriflow you clean and prepare meshes, with Poly Build, snapping and Shrinkwrap you build topology that follows the shape, and with the rules of quads, edge loops and poles you leave the model rig-ready. Practice on a simple character and you will notice the difference as soon as you deform it. On this platform you will find video tutorials on sculpting, rigging and character animation to complete the workflow from start to finish.