Night scene lighting in Blender: neon, area lights and atmosphere

Diego Cortés
Author
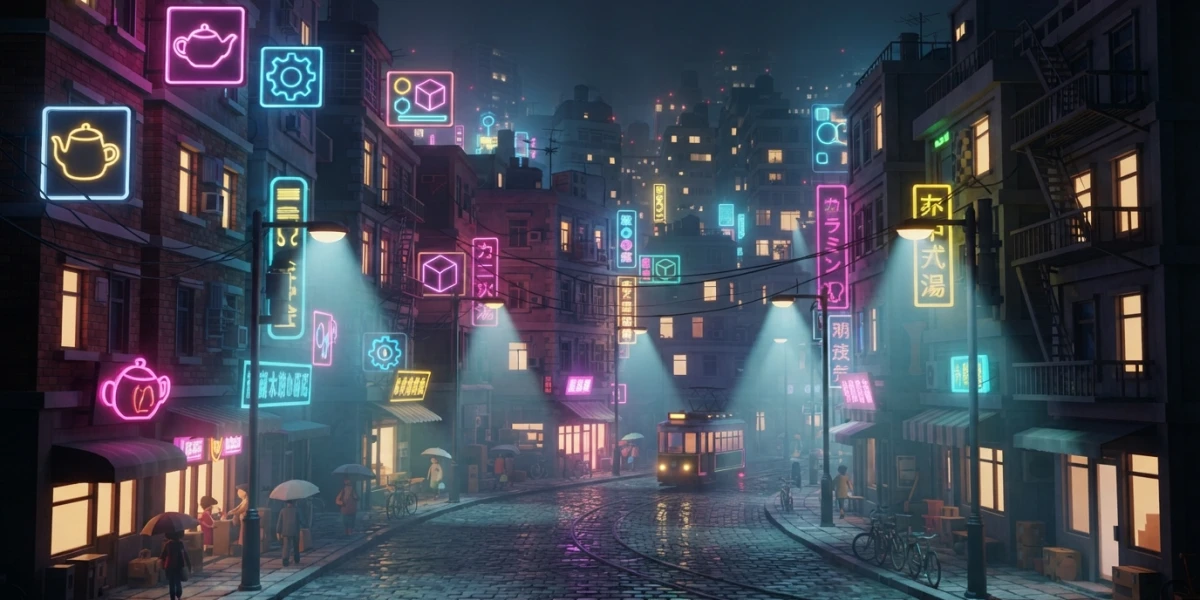
A night street is not dark: it is full of small, motivated light sources. Night scene lighting in Blender works when every light has a reason to exist, and that is the first step away from flat, lifeless renders.
Night is not darkness: it is motivated light
Before touching a single parameter, look at the scene the way a cinematographer would. A facade at night is not lit by a general light: it is lit by the neon sign on the corner, the street lamp drawing a cone over the sidewalk, the lit windows of the upper floors and, if you are lucky, the moon. Each of those sources is a design decision, and darkness is simply the contrast left between them.
Building from motivation has an immediate practical advantage: if every light matches a visible element of the scene, the render gains coherence and the viewer accepts the image without effort. A floating light with no justification is, on the other hand, the easiest mistake to spot in a night render, even when the technical values are perfect.
The recommended workflow is the opposite of what usually tempts us: instead of turning a light on and then explaining its presence, first list the practical sources in the scene (signs, street lamps, windows, moon) and then build each one with the right tool. That order turns night lighting into an exercise in observation rather than guesswork.
Neon signs: emission shaders + area lights
Neon signs are the most expressive element of a night urban scene and the one that benefits most from combining two techniques: an emission shader for the sign itself and area lights so the light spills onto the surroundings.
The emission shader
The Emission node turns any surface into a visible light source in the render. It is a Lambertian emission shader: it emits the same amount of light in all directions, which makes it ideal for screens, lettering and lit windows. You can use it as a material on its own or feed a surface output inside a more complex material, for example combined with a Mix node so the sign only turns on at night.
One detail makes a real difference: the strength of point, directional and area lights is specified in watts of radiant flux, so the value you type in the Power field should be thought of in physical terms, not as a simple more or less. The Blender manual includes a reference power table that is worth keeping at hand, detailed in the physical values section.
Light shape matters
Area lights are designed to simulate real surface emitters. The Blender manual itself recommends them for cases like a TV screen, office neon lights or a window, and explains that they produce shadows with soft edges, in contrast with point lights, which cast hard edges.
The shape of the area is part of the result: you can choose between Rectangle, Square, Disk and Ellipse, and the proportions should mimic the source. A horizontal neon tube asks for a long horizontal rectangle; a facade window, a vertical rectangle; a TV screen, a vertical square. With that correspondence, the shadows and reflections in the scene respond naturally, and the viewer senses the shape of the source even without seeing it directly.
Street lamps and windows: spots with cone control
Street lamps are the classic case of directional light with a well-defined cone. The Spot light offers two controls worth understanding separately: Size defines the angle of the outer cone and Blend softens the edge of the inner cone with a value between 0.0 and 1.0. With Blend at 0 the edge is razor sharp; with high values, the falloff becomes gradual and natural.
A warning from the manual that avoids confusion: neither Size nor Blend control the softness of the shadows cast by the light. The shadow of a street lamp on the ground depends on the size of the source and the distance, not on the cone. For soft street-lamp shadows, use an area light or a spot with a larger source size.
The most useful trick for street lamps is to combine the spot with a light volume: the light cone becomes visible as a beam crossing the fog, and the scene gains depth instantly. This combination is detailed in the atmosphere section.
Physical values: the manual's power table
The power of point, area and spot lights is measured in watts of radiant flux, not in electrical watts: it is the amount of light energy the source emits, not what you would pay on an electricity bill. The sun, for its part, is measured in watts per square meter.
The Blender manual publishes a reference power table that solves most doubts. Paraphrasing its values: a candle corresponds to about 0.05 W in a point light; an 800-lumen LED bulb, to about 2.1 W; a 1000-lumen bulb, to 2.9 W; a 1500-lumen PAR38 spotlight, to about 4 W in a disk area light; a 2500-lumen fluorescent tube, to 4.5 W in a rectangular area; and a car headlight, to about 22 W in a 125-degree spot.
These values are a starting point, not a law: they put the first lighting pass in the right order of magnitude so fine-tuning is a matter of nuance, not of rescaling. They are especially useful in night scenes, where the temptation to raise the power until something shows destroys the atmosphere.
Moonlight: 0.001 W/m²
The extreme case is the moon: the manual places it at about 0.001 W/m², a figure so low that the human eye adapts and perceives the scene, but the render does not. If you light a night scene with a moon sun at that value and nothing else, the result will be almost black.
The solution is not to raise the power until it looks like daytime, but to compensate the render exposure under Render ‣ Film so dark values are lifted without destroying contrast. It is also worth remembering that the color of light affects perceived brightness: green looks brighter than red or blue at equal power, so the tint of moonlight influences how much of the scene you can actually see.
Atmosphere: volumetric fog and light rays
Without atmosphere, a well-lit night scene still looks like a set. Volume turns light into something tangible: the beams of street lamps, the glow of neon over fog and the depth of the street.
Principled Volume
The Principled Volume shader is applied to a cube that encloses the scene and turns the space into a participating medium. Density controls the strength of the effect: values close to 0.025 give a light haze that barely suggests depth, while 0.5 to 1.0 produce dense fog. Anisotropy, between -1 and 1, decides how light scatters: negative values diffuse it in all directions and positive values concentrate it forward, which is the behavior of car headlights crossing fog.
For irregular fog, connect a Noise texture with a Color Ramp into the density input: the haze stops being uniform and gains the organic movement seen on real streets. It is also wise to limit the volume to the area the camera sees, because a giant volume cube makes the render more expensive without adding anything visible.
Eevee vs Cycles
The difference between engines is precision versus cost. Cycles calculates volume accurately, sampling the light that passes through it, at the expense of longer render times; Eevee approximates it and requires adjusting the volumetric samples in the engine settings to avoid banding or noise. For a first version of the fog, Eevee with well-configured volumetric samples gives very good results and allows fast iteration; the final quality render can be left to Cycles.
Color and exposure: the final pass
The last pass is about color. Moonlight asks for a cool, bluish tint, while neon signs and street lamps work with warm amber or with the saturated colors of each sign. That contrast of temperatures is what separates a believable night scene from a flat, grayish image.
White balance and exposure are adjusted as a final step, looking at the full rendered image rather than isolated elements: a neon sign can look perfect in the viewport and still drag the whole scene into an unreal tone. Iterating with the final image open, adjusting exposure, temperature and light power in that order, is the fastest way to close a believable night.
Conclusion
Night scene lighting in Blender stops being a mystery when you apply three principles: motivated light from visible sources, realistic power values taken from the manual, and volumetric atmosphere that makes that light tangible. With them, a night urban scene is built in layers, and the final result has the warmth of a real street instead of the coldness of a badly lit dark scene.
If you want to see these concepts in action, the platform hosts curated video tutorials on lighting and rendering to keep learning with practical examples.